Hey there, tech enthusiast! If you're reading this, chances are you're diving headfirst into the world of IoT and cloud computing. Welcome to the ultimate guide on RemoteIoT SSH AWS Example! Whether you're a seasoned developer or just starting out, this article will walk you through everything you need to know to set up secure connections between your IoT devices and AWS. So, buckle up and let's get started!
Imagine this: you're building a smart home system or an industrial automation project, and you need to manage your IoT devices remotely. That's where RemoteIoT SSH AWS comes into play. It's not just about connecting devices; it's about doing it securely, efficiently, and with minimal hassle. In this guide, we'll explore how to use SSH to connect your IoT devices to AWS, ensuring that your data stays safe and your operations run smoothly.
Before we dive deep, let me assure you that this isn't just another tech article. We'll cover everything from the basics to advanced configurations, with real-world examples and practical tips. By the end of this, you'll be equipped with the knowledge to set up your own RemoteIoT SSH AWS environment like a pro. Ready? Let's go!
Read also:Why Vega Movies Is Your Ultimate Destination For Film Buffs
What is RemoteIoT SSH AWS Example?
Let's break it down for you. RemoteIoT refers to managing IoT devices from a distance, while SSH (Secure Shell) is a network protocol that allows you to securely connect to remote servers or devices. AWS, or Amazon Web Services, is the powerhouse of cloud computing, offering a wide range of services to support your IoT projects.
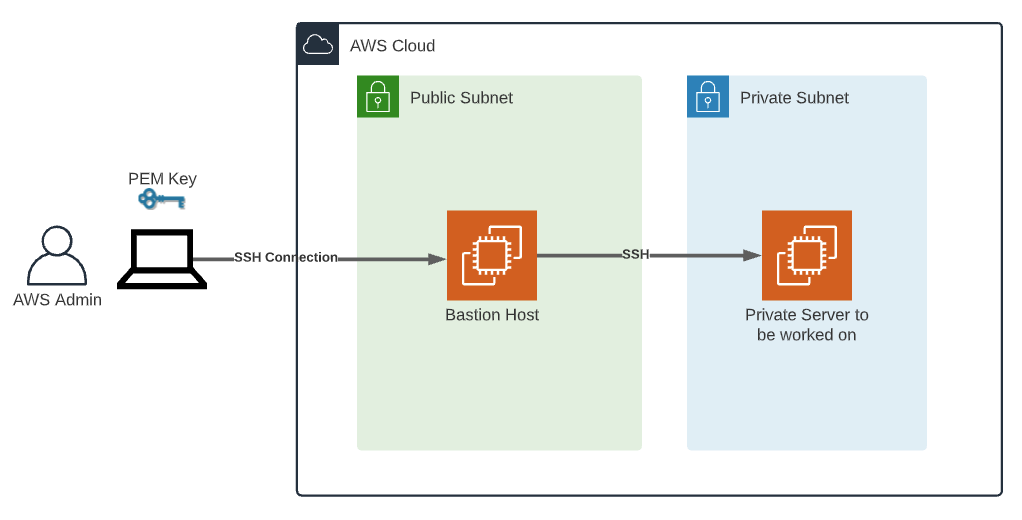
The RemoteIoT SSH AWS Example is essentially a setup where you use SSH to connect your IoT devices to AWS services. This setup ensures that your devices can communicate with the cloud securely, enabling you to monitor, control, and manage them from anywhere in the world. It's like giving your devices a secure line to the cloud, where all the heavy lifting happens.
Why Use SSH for RemoteIoT on AWS?
Now, you might be wondering, "Why SSH? Why not just use plain old HTTP?" Great question! SSH offers several advantages that make it ideal for RemoteIoT on AWS:
- Security: SSH encrypts all data transmitted between your device and the server, making it much harder for hackers to intercept sensitive information.
- Reliability: SSH connections are more stable and less prone to interruptions compared to other protocols.
- Flexibility: You can use SSH to run commands, transfer files, and even set up secure tunnels for other applications.
- Scalability: As your IoT project grows, SSH can handle the increased load without breaking a sweat.
Setting Up Your AWS Environment
Before you can start connecting your IoT devices via SSH, you need to set up your AWS environment. Here's a quick rundown of the steps:
Step 1: Create an AWS Account
First things first, you'll need an AWS account. If you don't have one already, head over to the AWS website and sign up. Don't worry; they offer a free tier that's perfect for testing and small projects.
Step 2: Launch an EC2 Instance
EC2 (Elastic Compute Cloud) is AWS's virtual server service. You'll need to launch an EC2 instance to act as the server for your IoT devices. When creating the instance, choose an AMI (Amazon Machine Image) that suits your needs, such as Ubuntu or Amazon Linux.
Read also:Melanie Griffith The Star Who Stole Hearts And Never Looked Back
Step 3: Configure Security Groups
Security groups act as virtual firewalls for your EC2 instances. You'll need to configure them to allow SSH access from your IP address. Make sure to restrict access to only the necessary ports to keep your instance secure.
Connecting Your IoT Device via SSH
Once your AWS environment is set up, it's time to connect your IoT device. Here's how you do it:
Step 1: Install SSH on Your IoT Device
Most IoT devices come with SSH pre-installed, but if yours doesn't, you'll need to install it manually. This usually involves running a few commands in the device's terminal. For example, on a Raspberry Pi, you can enable SSH by running:
sudo raspi-config
Then navigate to the SSH option and enable it.
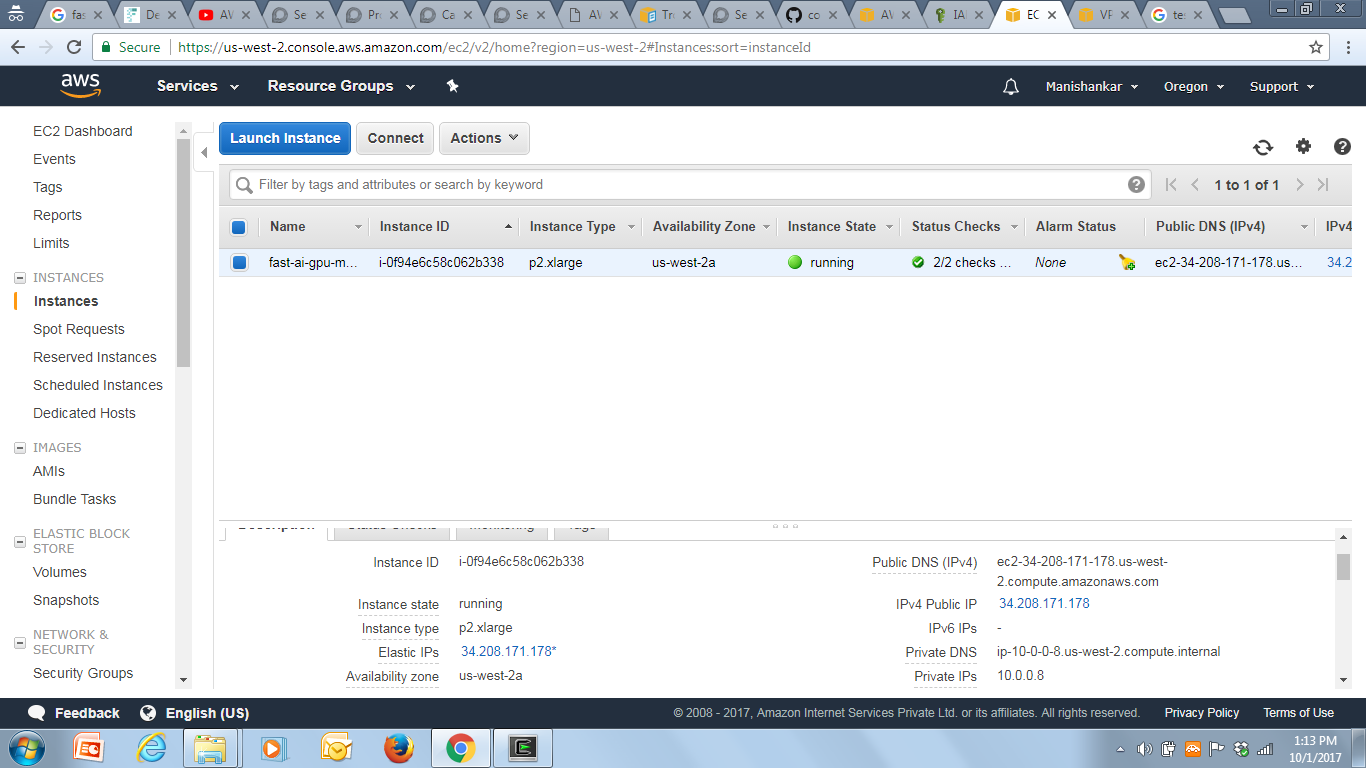
Step 2: Obtain Your EC2 Instance's Public IP
To connect to your EC2 instance, you'll need its public IP address. You can find this in the AWS Management Console under the EC2 dashboard. Make sure to note it down; you'll need it in the next step.
Step 3: Establish the SSH Connection
Now, it's time to connect your IoT device to the EC2 instance. Open a terminal on your device and run the following command:
ssh -i /path/to/your/key.pem ec2-user@your-public-ip
Replace "/path/to/your/key.pem" with the path to your EC2 key pair file and "your-public-ip" with the public IP of your EC2 instance. If everything is set up correctly, you should now be connected to your AWS server.
Best Practices for RemoteIoT SSH AWS
While setting up your RemoteIoT SSH AWS environment is exciting, it's important to follow best practices to ensure security and efficiency:
- Use Strong Passwords: Always use strong, unique passwords for your SSH keys and AWS account.
- Limit Access: Restrict SSH access to only the necessary IP addresses to minimize the risk of unauthorized access.
- Regular Updates: Keep your IoT devices and EC2 instances up to date with the latest security patches.
- Monitor Logs: Regularly check your server logs for any suspicious activity.
Common Challenges and Solutions
As with any technology, you might encounter some challenges when setting up your RemoteIoT SSH AWS environment. Here are a few common issues and their solutions:
Challenge 1: Connection Issues
Solution: Double-check your security group settings and ensure that the correct ports are open. Also, verify that your EC2 instance's public IP hasn't changed.
Challenge 2: Slow Performance
Solution: Optimize your EC2 instance by choosing the right instance type and ensuring that your IoT devices are sending data efficiently.
Challenge 3: Security Concerns
Solution: Implement multi-factor authentication (MFA) for your AWS account and use SSH keys instead of passwords for added security.
Real-World Examples of RemoteIoT SSH AWS
To give you a better idea of how RemoteIoT SSH AWS can be used, here are a couple of real-world examples:
Example 1: Smart Agriculture
Imagine a farmer using IoT sensors to monitor soil moisture levels. By connecting these sensors to AWS via SSH, the farmer can receive real-time updates and make data-driven decisions to optimize crop yield.
Example 2: Industrial Automation
In a manufacturing plant, IoT devices can be used to monitor machine performance. With RemoteIoT SSH AWS, engineers can remotely access these devices to perform maintenance and troubleshooting, reducing downtime and increasing efficiency.
Data and Statistics
According to a report by IoT Analytics, the global IoT market is expected to grow to $1.1 trillion by 2026. This growth is driven by advancements in cloud computing and secure communication protocols like SSH. AWS, being a leader in cloud services, plays a crucial role in this expansion, offering scalable solutions for IoT projects of all sizes.
Conclusion
And there you have it, folks! A comprehensive guide to RemoteIoT SSH AWS Example. By now, you should have a solid understanding of how to set up and manage your IoT devices using SSH and AWS. Remember, security is key, so always follow best practices to protect your data and devices.
So, what are you waiting for? Go ahead and start building your own RemoteIoT SSH AWS environment. And don't forget to share your experience in the comments below. Who knows? You might inspire someone else to take the leap into the world of IoT and cloud computing!
Oh, and if you found this article helpful, be sure to check out our other guides on tech topics. There's always something new to learn, and we're here to help you every step of the way. Happy coding!
Table of Contents